How to Create Presets and Articles in SCwriter
Presets in SCwriter allow you to save and quickly apply custom settings for different types of articles, streamlining your content creation process. This guide will walk you through creating, editing, and managing presets in SCwriter.
What Are Presets?
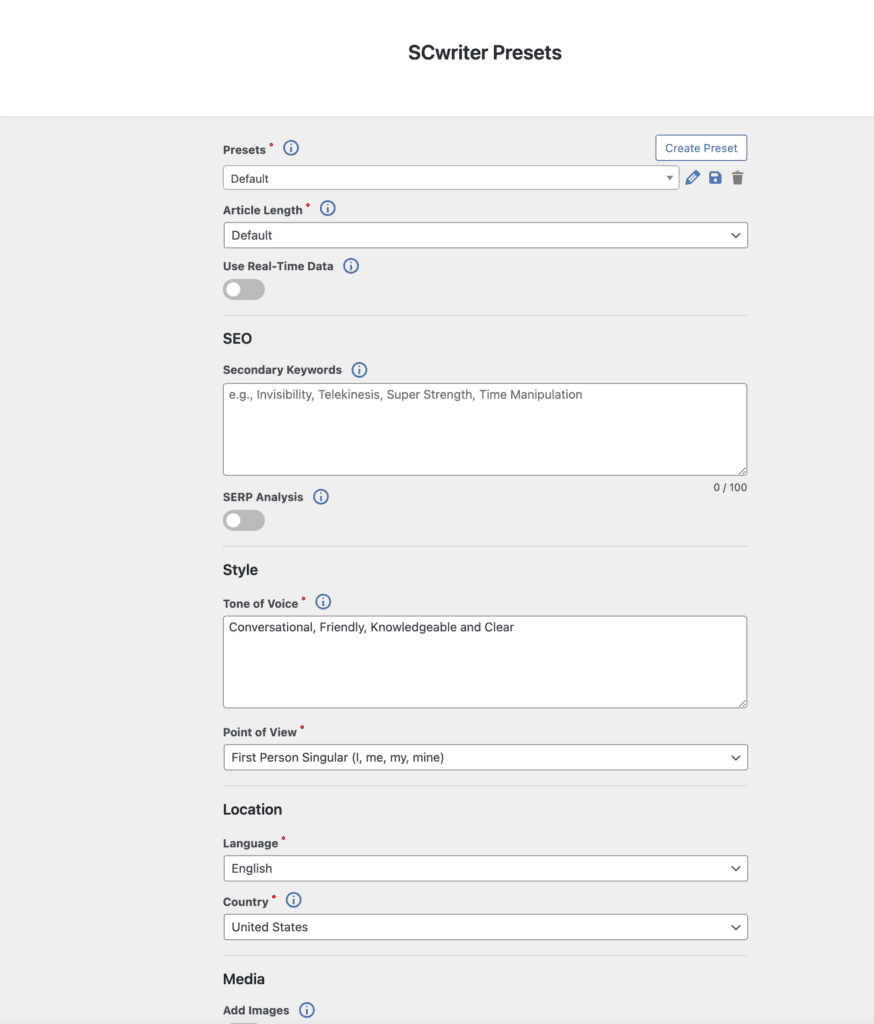
Presets are saved configurations of settings in SCwriter that define how articles are generated. They include options for article length, tone, language, SEO settings, and more. By creating presets, you can quickly apply a set of preferences to new articles, ensuring consistency and saving time.
Accessing the Presets Section
- Log into WordPress Admin Dashboard
- Navigate to your WordPress admin panel (yourwebsite.com/wp-admin).
- Access SCwriter Presets
- In the left-hand menu, find SEO Blog Writer.
- Click on Presets under the SEO Blog Writer menu.

Creating a New Preset
Step-by-Step Guide
- Add New Preset
- Click on the Create Preset button at the top of the Presets page.
- Configure Preset Settings
- You’ll be presented with various fields and options to define your preset.
Let’s go through each setting:
Preset Name
- Description: Enter a descriptive name for your preset to identify it easily later.
- Example: “Long-Form Articles”, “SEO-Friendly Posts”, “Conversational Tone”.
Article Length
Options:
- Default: AI analyzes top competitors to determine optimal length.
- Specific Size:
- Shorter: Press releases, Announcements (400-600 words)
- Short: News, Demos (600-1000 words)
- Medium: B2B Cases, Info Blogs (1000-1400 words)
- Long: Guides, How-tos (1600-2400 words)
- Longer: Pillars (2400-2800 words)
- Custom Word Count: Enter a specific word count.
Usage: Select based on how detailed you want your articles to be.
Secondary Keywords
- Description: Input additional keywords or entities to include in the article.
- Format: Separate by commas or enter each keyword on a new line.
- Usage: Enhances SEO by incorporating related terms.
SERP Analysis
- Description: Analyzes top-ranking pages to extract relevant entities.
- Usage: Improves article comprehensiveness and ranking potential.
Preview Outline
- Description: Generates an editable outline before creating an article.
- Usage: Allows you to adjust the structure beforehand.
Tone of Voice
- Description: Entry the tone of voice for your article by combining the most popular options: Analytical, Authoritative, Casual, Clear and Concise, Conversational, Empathetic, Encouraging, Energetic, Excited, Formal, Friendly, Honest, Humorous, Informative, Inspirational, Knowledgeable, Motivational, Persuasive, Playful, Professional, Storytelling.
- Usage: Sets the writing style to match your brand or audience preference.
Point of View
- Options:
- First Person Singular (I, me, my, mine)
- First Person Plural (we, us, our, ours)
- Second Person (you, your, yours)
- Third Person (he, she, it, they)
- Usage: Determines the narrative perspective.
Language and Country
- Language: Choose the language for the article.
- Country: Select the target country for localized content.
- Usage: Tailors content to your audience’s language and locale.
Use Real-Time Data
- Description: Incorporates current data from Google search results.
- Usage: Ensures content is up-to-date.
Add Images
- Choices:
- Placeholder Images: inserts gray background images
- Pexels Stock Photos: automatically adds free images from pexels.com
- Usage: Adds visual elements to your articles with SEO-friendly ALT tags.
Linking
- External Links: We will automatically add relevant external links to websites that are non-competitive with your primary keyword.
- Internal Links: We will automatically add internal links from already published posts or pages.
- Stop Words for External Links: Enter words to block certain external links. We won’t add links containing these words. Use commas or new lines to separate each word.
Sections
Adds the next sections automatically to your articles.
- Include Introduction
- Include Conclusion
- Table of Contents: Improves navigation within your articles.
- Table of Contents CSS Class Name: Specify for styling purposes.
- Table of Contents Title: Name the TOC section.
Extra Prompts
Customize content to meet specific needs.
- Extra Introduction Prompt: Provide additional guidance for the introduction.
- Extra Body Prompt: Offer specific instructions for the article body.
- Extra Conclusion Prompt: Guide the AI for the conclusion.
Organizers
- Include Categories: Enable reuse or creation of new categories.
- Create New Categories: When checked, we will create new categories if relevant ones are not found in the list. If unchecked, we will use only existing categories.
- Include Tags: Enable to reuse or create new tags.
- Section Dividers: Adds horizontal lines between sections.
Global Prompt
- Description: A prompt that guides the AI throughout the article.
- Usage: Ensures consistency and aligns content with your goals.
Stop Words
- Description: Words to be ignored during content processing.
- Format: Enter each word on a new line.
- Usage: Prevents certain words from appearing in the content.
Improve Readability
When enabled, we will use simpler words, phrases, and shorter sentences to target an 8th-grade reading level.
Saving and Updating Presets
- Save Preset: After configuring the settings, click Save Preset at the bottom.
- Update Preset: To modify an existing preset, make changes and click Save Preset to update.
Managing Presets
- View All Presets: Return to SEO Blog Writer > Presets to see all your presets.
- Edit a Preset: Click Edit under the preset name to modify it.
- Delete a Preset: Click Delete to remove a preset you no longer need.
Using Presets in Content Creation
- Navigate to Content Creation
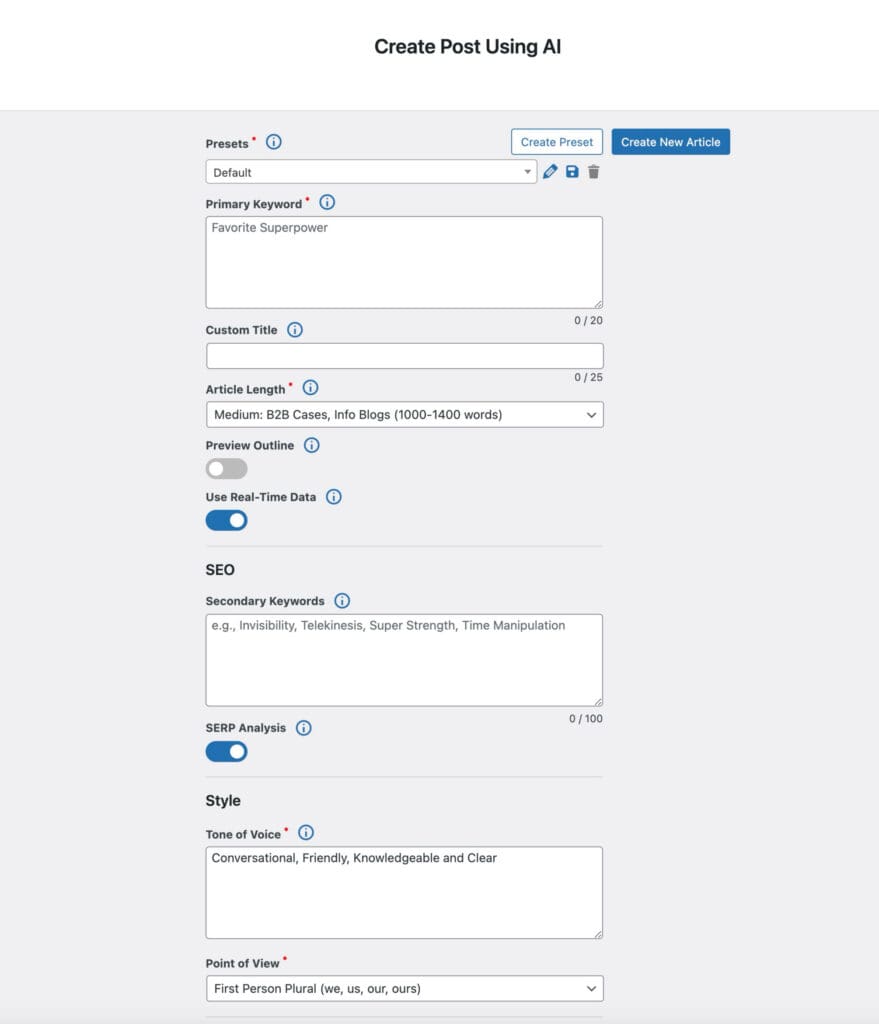
- Go to SEO Blog Writer > Create New Post.
- Select a Preset
- Choose your desired preset from the Preset dropdown menu.
- Enter Primary Keyword
- Input the main keyword or custom title for your article.
- Preview Outline
- When enabled, an editable outline will be created before writing your article. You can reorder, delete, and add new sections to the outline before generating the article.
- Generate Content
- Proceed to generate the article using your preset settings.

Tips for Effective Preset Use
- Descriptive Naming: Use clear names for your presets to identify them easily.
- Multiple Presets: Create different presets for various content types or goals.